
The PSD School
Section 4 by Lars Stenberg, ESDE AB
How to select suitable light source for a triangulation probe
In Part 2 of SiTek´s PSD School we dealt with design parameters for a triangulation probe and derived the eleven formulae which are best used when designing a triangulation probe. In Part 3 we studied how these are applied in practice. In this and future parts we will be looking at how to select and find suitable optical components for a triangulation probe. To make this part easier to read, we have incorporated Figure 1 from Part 2 into Part 4, also as Figure 1.
Light source
We need some kind of light source which sends a beam of light in the direction AD towards the object to which we wish to measure the distance.
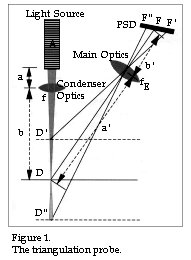 It is important to ensure that the light beam undergoes what is known as diffuse reflection when it hits the object
to be measured since only then will light travel via the main objective E. One example of
a diffuse reflector is ordinary white typing paper. The opposite of diffuse reflection is
specular reflection, which means that the light beam is reflected as per the law of
reflection; that is to say, the angel of incidence is equal to the angel of reflection. In
practical terms, this means that if a light beam hits a mirrored surface, for instance, at
right angles, the light is reflected back in the same direction from which it came. No
light hits the main objective E, which means that no signal is emitted by the detector F.
In practice, therefore, it is necessary to take care when using shiny plastic surfaces,
glass surfaces or shiny plastic surfaces. If in doubt, you should carry out a test to find
out whether a sufficient amount of light is being diffused in the direction of the main
objective E in order to receive a sufficiently strong measurement signal or to find out if
it is necessary even to reduce the angle (and thereby impair the accuracy of the
measurement).
It is important to ensure that the light beam undergoes what is known as diffuse reflection when it hits the object
to be measured since only then will light travel via the main objective E. One example of
a diffuse reflector is ordinary white typing paper. The opposite of diffuse reflection is
specular reflection, which means that the light beam is reflected as per the law of
reflection; that is to say, the angel of incidence is equal to the angel of reflection. In
practical terms, this means that if a light beam hits a mirrored surface, for instance, at
right angles, the light is reflected back in the same direction from which it came. No
light hits the main objective E, which means that no signal is emitted by the detector F.
In practice, therefore, it is necessary to take care when using shiny plastic surfaces,
glass surfaces or shiny plastic surfaces. If in doubt, you should carry out a test to find
out whether a sufficient amount of light is being diffused in the direction of the main
objective E in order to receive a sufficiently strong measurement signal or to find out if
it is necessary even to reduce the angle (and thereby impair the accuracy of the
measurement).
What demands should be made of the light beam?
First and foremost, it is necessary to decide which light wavelength to use. If, for example, one wishes to see exactly where on the measurement object distance is being measured, one should select a light source in the visible wavelenght range, that is to say between 400 and 700 nm. If the measurement object absorbs a lot of light, such as black rubber, one should select a wavelength range closer to 700 nm if one still wishes to see the measuring light, as the maximum sensitivity of most PSDs is in the region of 930 nm. In other cases, it may be distracting for the operator (for example) to look at a small red spot on the measurement object, and in this instance a wavelength in excess of 700 nm should be selected.
Often is it desirable for the spot of light which occurs when the light beam AD hits the measurement object to be as small as possible. There are several reasons for this. Firstly, the actual measurement object may require a small spot of light, such as when measuring threads on a screw. Secondly, it is easier to achive good triangulation probe linearity if the spot of light is not too big. This is due to the fact that if the main objective is not sufficiently well corrected in respect of optical reproduction errors, a large sport of light will be reproduced as an even bigger spot of light on the detector at the edge of the main objectives´field of vision, i.e. at the points D´ and D´´. Since a PSD measures what is known as the central point of gravity of the light spot, an error will occur in measurement if, for instance, the image of the spot of light is impaired by strong spherical aderration and coma. Furthermore, it is desirable for the light beam to be of approximately the same diameter over the entire measurement range for the reasons outlined above. A bunch of rays which comprises parallel light beams is known as a collimated light beam. If the light beams are not strictly parallel, but are instead slightly convergent or divergent (approx. 0.05 radians or less), this is sometimes known as a quasicollimated light beam. The light beams used with triangulation probes are a good example of quasicollimated light beams.
How are quasi-collimated light beams generated?
There are primarily two things which should be taken into consideration when such a light beam is to be generated: what is known as Gaussian amplification, and also the diffraction of the light; that is to say, the diffraction phenomena caused by the fact that the wavelength of the light is not zero. The first problem with Gaussian ampliflication affects what is known as the geometric optics, which deals with that part of the optics which can be explained in relation to the laws of reflection and refraction. The various subfigures in Figure 2 show how to determine where the image lands and how big it is using three auxiliary beams if the focal length f of the lens, the distance of the object from the lens and the size of the object are known. The following applies for these three auxiliary beams:
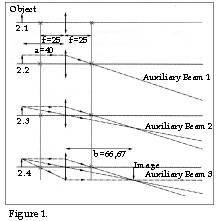 Auxiliary beam 1: A light beam which approaches a lens from the left in
parallel with the optical axis leaves the lens via the focal point of the lens (for a
positive lens the right focal point, and for a negative lens the extension of the light
beam goes backwards via the left focal point).
Auxiliary beam 1: A light beam which approaches a lens from the left in
parallel with the optical axis leaves the lens via the focal point of the lens (for a
positive lens the right focal point, and for a negative lens the extension of the light
beam goes backwards via the left focal point).Auxiliary beam 2: A light beam which passes through the central point of a thin lens is not broken.
Auxiliary beam 3: A light beam which approaches a positive lens via one focal point leaves the lens in parallel with the optical axis.
Of course, it is also possible to calculate the distance from the lens at which the image is formed by means of what is known as the lens formula:
Equation 1/a + 1/b = 1/f
where a is the distance from the object to the lens, b is the distance from the lens to the image, and f is the focal lenght of the lens. If we enter the values in Figure 2 and calculate b, we find that b = 66,67 mm.
If we study Figures 2.3 or 2.4, we can see that it is possible to draw a diagram and thereby easily determine the focal lenght of the lens which we need in order to generate an appropriate light beam. Since we have decided in accordance with the above to use a free air separation of 100 mm, we draw a new diagram (see Figure 3.1) in which we can draw the line b as 120 mm, since the lens in reality is of a specific thickness, and to this must be added the lens mounting. It may also be necessary to include a safety window in order to protect the optical components from oil, particles of metal, etc. Then we can draw in the light source. I have drawn the image as being 20 mm in size in Figure 3. In reality, we want as small an image as possible, but we shall be using Figure 3 only to determine the focal length of the condenser lens. We shall return to the question of the size of the spot of light soon. Therefore, the condenser lens is placed 120 mm from the object, but where should the actual light source be placed? If we make the distance a large, image enlargement of the light source will certainly be reduced, but on the other hand the condenser lens will not be able to catch as many light beams from the light source, which means that less light will be reflected via D. Moreover, a large distance a may perhaps necessitate a larger housing for the triangulation probe. The distance a should therefore be 30 mm or less.
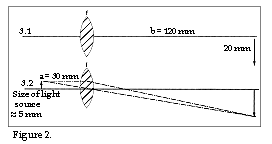 Once
this has been done, it is sufficient to use auxiliary beam 2 as shown in Figure 2.3 to
work out the size of the light source. Figure 3.2 shows that the light source is
approximately 5 mm. The light source is therefore enlarged approximately four times. Since
uniform triangles are always applicable, we are now able to establish that it really does
not matter how large an image is drawn from the start, since it is always possible to read
off the enlargement using Figure 3.2. Figure 3.2 also shows that the focal length of the
condenser lens is approximately 24 mm. Inserting 30 mm as the value a and 120 mm as the
value b in the lens formula given above, we find that the focal length f of the condenser
lens is 24 mm in this case as well.
Once
this has been done, it is sufficient to use auxiliary beam 2 as shown in Figure 2.3 to
work out the size of the light source. Figure 3.2 shows that the light source is
approximately 5 mm. The light source is therefore enlarged approximately four times. Since
uniform triangles are always applicable, we are now able to establish that it really does
not matter how large an image is drawn from the start, since it is always possible to read
off the enlargement using Figure 3.2. Figure 3.2 also shows that the focal length of the
condenser lens is approximately 24 mm. Inserting 30 mm as the value a and 120 mm as the
value b in the lens formula given above, we find that the focal length f of the condenser
lens is 24 mm in this case as well.In Part 3 we calculated the focal length of the main objective, and in Part 4 we have calculated the focal length of the condenser lens. In the next part we will be discussing the choice of light source and determining the suitable condenser lens aperture. We will then be discussing how to obtain the various optical components required.
|
« home