
The PSD School
Section 7 by Lars Stenberg, ESDE AB
How to optimise a collimation lens
In Section 6 of SiTek's PSDschool we started to discuss how one might specify and obtain suitable optical components for a triangulation probe. Section 6 concluded with the study of a lens made of glass grade BK7 with radii of r1 = +35,80mm, r2 = -11,59mm with a thickness of 1.0mm. The largest diameter of the light spot for this lens, because of the gaussian enlarge-ment and diffraction, is 30 + 2x30,7µm = 91,4µm.
Before we decide to use such a lens in a triangulation probe, we must let the computer carry out a final check of the calculation. This will show the sensitivity of the lens to a decentering of the laser diode. There is always a tolerance on how precisely the laser beam emitted by the laser diode is centred, in relation to the laser diode itself. I have therefore used the computer to calculate the appearance of the light spot and its diameter when the laser diode has been moved 0,3mm away from the optical axis
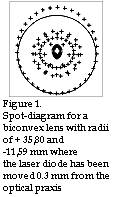 in a
radial direction. The results are shown in figure 1.
in a
radial direction. The results are shown in figure 1.The radius of the light spot has now increased to 36,48µm, an increase of ca 20%. If such an increase is unacceptable, the alternatives are either to select laser diodes with sufficiently tight tolerances, or mount the laser diode so that it can be adjusted to the correct position. Note that one must always be able to focus the laser diode along the optical axis if one wants to ensure that one is really working with the smallest light spot.
Glass with a higher refractive index
A further possibility of slightly reducing the diameter of the light spot through the use of a simple lens is to select an optical glass with a higher refractive index than that of BK7. One example of such glass is SFL6, which has a refractive index of 1,79609 for 656,3 nm. If the lens's focal distance must still be 17,1mm then the radii of the curvature of the lens will be longer, the index of the gap between the air and the surface of the lens having increased. However, as the radii of the lens increase the aberrations decrease. We can therefore increase the free opening, which in its turn means that the diffraction decreases and thereby the radius of
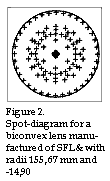 the Airy-disk. The result is shown in
figure 2. The computer has now calculated r1 to be 155,67 mm and r2 to be -14,90 mm.
the Airy-disk. The result is shown in
figure 2. The computer has now calculated r1 to be 155,67 mm and r2 to be -14,90 mm.Figure 2 now shows that the radius of the airy-disc in relation to the radius of the light spot is 26,6µm if the free lens opening is 3,45mm. As a result, the image of the maximum diameter of the light spot is 30 + 2x 26,6µm = 83,2µm. To obtain such a point of light in reality we would, however, require a laser diode which emits light at an angle of 10,06o
Let us check how the new lens reacts to a decentering of 0,3mm. The result is shown in fig. 3.
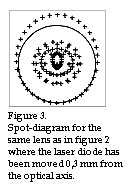
The radius has increased from 26,6µm to 33,9µm representing an increase of 27%, i.e.. 7% more than for the BK7 lens described above. The reason for the increase is that the relative change in angle is greater when the beams of light strike the SFL6 lens, which has longer radii than when the beams of light strike the BK7 lens, with its somewhat shorter radii.
The above example illustrates something that is valid for all optical systems, namely, the more one optimises an optical system for a given purpose, the more sensitive it becomes to changes from the optimised ideal conditions. This said, we have exhausted all possibilities regarding the minimisation of the size of the light spot. I will, however, stress one possibility which obviously would reduce the size of the light spot, were we able to slightly moderate the distance of 120mm. Since the diffraction has a certain size of angle which depends on the wavelength of the light employed and the free opening, the consequence is that if we reduce the distance of 120mm to half, the radius of the airy-disc would be halved. Then the size of the geometrical light spot would, with an SLF6 lens, be 13,3µm resulting in the diameter of the light spot, including diffraction, becoming: 30 + 2x 13,3 = 56,6µm. But here, we have deviated from the original constructional mission.
If we wish to reduce the diameter of the light spot but still retain the measured distance of 120mm we must, because of the diffraction, either reduce the applied light wavelength or increase the size of the free opening. Because laser diods in the red part of the spectrum are less expensive, it is essential, above all, to increase the size of the free opening. Having now exhausted all the possibilities regarding the use of a single lens we must investigate the possibilities of using two or more lenses.
Definitions
Before continuing, I want to introduce other concepts and definitions. By "objective" we mean an optical system comprising of one or more similar or dissimilar lenses (and/or mirrors) which, when combined, are used to give a primary image of the object. In a telescope or a microscope the objective gives rise to a primary image which is enlarged with the aid of an eyepiece. In a camera, however, the image projected by the objective onto the film is the final image. A lens system is therefore not necessarily the same thing as an objective. On the other hand, a well-designed objective often consists of several lenses, even if this is not a necessity.
A single lens in an objective is usually called an "element", and lenses that are cemented together or are mounted singly in the fitting of the objective are called a "group". The design of a 6-lens objective can thus be described as an objective consisting of 6 "elements" in 4 "groups". However, in order to find out exactly which lenses are cemented together it is necessary to consult a diagram describing the objective.
Because we wish to reproduce the emitting opening of the laser-diode at the point to which we want to most accurately measure the distance, the optical system we require can be described as the objective. However, since at the same time we are trying to collect as much light from the laser-diode as possible, our objective also functions as a condenser ("condense" means to concentrate, squash together). If we therefore call the required objective a condenser objective it will thus yield further information as to it's function when consulting a specialist. Up to now I have used the term "lens" which is acceptable as long as one uses an objective consisting of a single lens. By using the term objective, it can be seen that there is a question of a system of lenses which has been corrected according to certain criteria in order to produce a primary image, as defined above.
In general, it is not possible to maintain a sharp point of light using a condenser objective consisting of a single lens if one wishes to obtain as much light as possible at the same time as the light consists of different wavelengths.
Optical aberrations
The optical aberrations that chiefly prevent us from constructing a good condenser objective consisting of a single lens, are spherical and chromatic aberrations. Spherical aberration is illustrated in figure 4
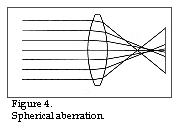 showing that beams of light striking the
lens at a maximum from the optical axis, cut the optical axis closer to the lens than do
the beams of light striking the lens at a shorter distance from the optical axis. Because
the spherical aberration depends on the diameter of the lens this is also called
"opening faults". The spherical aberration is said to be positive when the edge
beams cut the optical axis closer to the lens than the more central beams.
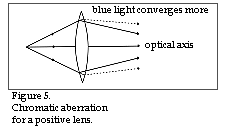
Positive spherical aberration can be reduced if the beams of light passed through diverging lenses. Spherical aberration can thus only be effectively reduced, apart from giving the lens optimal shape, by using two or more lenses. Chromatic aberration is illustrated in figs 5 and 6, with results from all elements having different refractive indices for different light wavelengths. This phenomenon is called dispersion. Generally valid for all elements is that the refractive index is always greater for blue light than for red. On the other hand, the size of the dispersion or the size of the refractive index difference can vary between different materials.
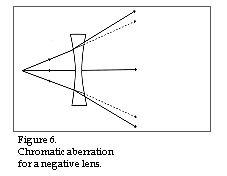
Studying figs 5 and 6, one can imagine that perhaps chromatic aberration can be reduced by pairing together a suitable positive lens with a corresponding negative one, thereby arriving at the same refractive index for blue and red colours, this after having passed both the lenses. Such an objective is called achromatic and was first designed in 1729. With the help of an achromatic objective one can, for example, achieve the same focus for blue and red light while the focus for yellow light exists in close proximity. The distance between these two foci is called the secondary colour error. If the intention is that all three or even more colours shall have the same focus, one must use even more lenses and such an objective called apochromatic.
In the next section of the PDS-school we will have a closer look at achromatics and how to decrease the light spot even further.
|
« home