
The PSD School
Section 8 by Lars Stenberg, ESDE AB
How to obtain an achromat with the required focal distance
In section 7, I gave one method of how to optimise a collimation lens, consisting of an achromat, by selecting glass with a significantly higher refractive index than normal. I also presented some other definitions, including the optical errors in reproduction known as spherical aberration and chromatic aberration. In this section, we shall look at the requirements necessary to obtain an achromat of the required focal distance, as well as how to construct a lens system in which its spherical aberration is corrected for even greater apertures than that which is possible for an achromat.
It is common for one to use a cemented two-lens achromat as condenser in the construction of triangulation probes. The positive lens is made of crown-glass, having a relatively low refractive index and low dispersion, and the negative lens of flint-glass, having a higher refractive index and greater dispersion. If an achromat is required to be used for the entire visible wavelength range, one often corrects the achromat so that it has the same focal distance for blue and red light; but this also means that it has a different focal distance for yellow light. Now, perhaps, some objections will be raised to the effect that there is no need for a colour-corrected objective since a laser diode emits light across a narrow wavelength range. This is certainly true, but by selecting an achromat one also achieves significantly better correction of the other monochromatic aberrations or image errors. Also, further improvement can be achieved by the elimination of the need for colour correction. Accordingly, we decide to select an achromat with the focal distance of 17,1 mm.
How can we obtain an achromat with a focal distance of 17,1 mm?
 If
one looks through some of the more popular catalogues from firms selling optical
components one finds achromats with focal lengths of 16 mm and 20 mm, but none with a
focal length of 17,1 mm. So what is to be done?
There are three options. 1) One can compromise and choose one of the above two focal lengths. 2) One can combine two achromats of appropriately selected focal lengths and place them in the triangulation probe in the way shown in figure 3. 3) One can have an achromat made to exactly the required focal length and possessing the characteristics for optimising the desired effect.
Option 1
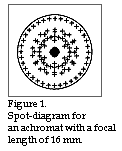
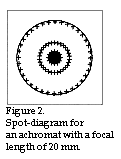
Which of the two achromats shall we choose? If we go for the one with a focal length of 20 mm we know that the beam of light will be greater than 2,5 mm in diameter if we are to employ as much light as possible. If we choose the achromat with a focal length of 16 mm the beam of light will certainly be somewhat less than 2,5 mm but, on the other hand, the diffraction will be greater. Let us therefore investigate the spot size for the two achromats. Figure 1 shows the spot for the achromat with 16 mm focal length and figure 2 shows the spot for the achromat with 20 mm focal length.
The achromat with a focal length of 16 mm and free opening of 3,3 mm (corresponding to an Airy-disc radius of 24,8 µm) has the spot radius of 22,4 µm. The achromat with a focal lenght of 20 mm and the free opening of 3,9 mm (in this case, the radius of the Airy-disc is 25,1 µm since the diaphragm lies slightly further from the laser diode on account of the longer focal length) has the spot radius of 24,0 µm. It is therefore plain to see that it is of no great significance which of the two lenses is chosen. However, if it is our wish that the optical system shall occupy as small a space as possible then we should choose the achromat with the 16 mm focal length. Why does the simple lens made of SFL6 which we designed before outperform both of the above mentioned achromats? The answer in this case is that the SFL6 lens is designed to optimise a particular application whereas both the achromats are optimised to give a good picture of an object with a certain optic angle, lying at an infinite distance.Figure 2
Option 2
This implies that we employ two different achromats of appropriately selected focal lengths. We must now refer to Section 5 of the PSD school (1/96) where we determined the basic geometry of the triangulation probe and found that the suitable distance from the laser diode to the collimation lens should be 20 mm, and the distance from the collimation lens to the centre point of the measuring range, 120 mm. We shall then try to obtain an achromat with a focal length of 20 mm and place it in such a way that the laser diode ends up in the achromat's best focus. Note that it is important how one uses an achromat since its best focus lies on the same side as its negative lens element, i.e. on the side of the achromat with the longest radius of curvature. Look again at figure 3. The light leaving the achromat becomes parallel indicating that we are using an achromat with the geometry for which it has been constructed; we are, in this instance, employing the achromat at its optimum usage. If we thereafter allow the parallel light from the first achromat to pass through another achromat with a focal length of 120 mm, the result will be to obtain an optimal focus ca 120 mm being the second achromat, assuming we have set it up in the correct way. The parallel light in this instance will first meet the achromat's positive element, see figure 3!
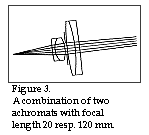
We shall therefore try to find two dissimilar achromats with focal lengths of 20 and 120 mms respectively. In Melles Griot's catalogue, for example, there is listed an achromat with a focal length of 20 mm (No LAO 11) and another at 120 mm (No LAO 134). Unfortunately the latter achromat has a diameter of 24 mm, which means that it must first be centred down if showing to be too large. Figure 3 shows how I have placed a diaphragm with a diameter of 5 mm at a distance of 0,5 mm from each achromat. Only in this instance it is not so important that the diaphragm is placed exactly here since we are working with an almost point-blank source of light. When, on the other hand, we use a similar combination as principal lens and have a greater field of view, then it is important to place the diaphragm in exactly that position so that we utilise those parts of the achromats which are impaired by the fewest aberrations. On the other hand, it is important to stop down the achromat in order to obtain the sharpest possible image. The spot size so obtained becomes 32 + 31,8 µm = 63,8 µm, and the spot's appearance is evident
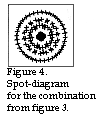 from
figure 4. The reason for our obtaining such a small spot with the help of the two
achromats is that we are working with the geometry with which they are made and thereby
optimised.
Option 3
Option 3 implies that we design an achromat for just this particular application, and we shall now see by how much the performance is improved.
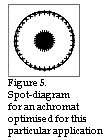 Figure 5 illustrates how
the spot appears when an achromat is optimised for this particular application. It is made
of crown-glass BAK4 and flint-glass SFL6. The free opening is 5,4 mm which corresponds to
an Airy-disc with a radius of 19,8 µm, and the spot radius is 18,9 µm. The maximum
diameter of the light spot for this achromat, because of the gaussic enlargement together
with diffraction, becomes 30+2x19,8µm=69,7µm.
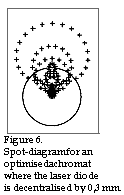 Figure 6 shows the appearance of the spot when we have decentralised the laser
diode by 0,3 mm. Calculations indicate the maximum decentralisation of the laser diode to
be around 0,05 mm if the spot is not to suffer from too great coma errors. Thus we
see that the field of view is unfortunately reduced when one optimises an achromat in
order to reduce the spherical aberration as much as possible.
If one needs an even smaller spot
 We must adopt a lens system with more than two lenses which are co-ordinated so as to
obtain an even smaller spot. Figure 7 shows a system consisting of three lenses made in
SFL6, and figure 8 shows a spot diagram for such a spot of light, the total diameter of
which (geometric + diffraction) is 17,7 + 19,7 µm = 37,4 µm.
 Does the above example represents a lower limit for how small a light-spot can be
achieved? The answer is no. In practical terms, the spot can be made as small as you wish
but we must not forget our initial requirement in that the beam of light should be
quasicollimated, i.e. that the beams leaving the collimation objective should be as good
as parallel. In the above example the beams of light leaving the collimation objective
form a cone with an angle of 1,45 degrees, as the diaphragm has a diameter of 7 mm. This
implies that the field of measurement can only be ±1 mm if we accept that the light-spot
at its maximum has a diameter of 75 µm.
Does the above example represents a lower limit for how small a light-spot can be
achieved? The answer is no. In practical terms, the spot can be made as small as you wish
but we must not forget our initial requirement in that the beam of light should be
quasicollimated, i.e. that the beams leaving the collimation objective should be as good
as parallel. In the above example the beams of light leaving the collimation objective
form a cone with an angle of 1,45 degrees, as the diaphragm has a diameter of 7 mm. This
implies that the field of measurement can only be ±1 mm if we accept that the light-spot
at its maximum has a diameter of 75 µm.In the next section of PSDschool I shall try to describe how one chooses the correct type of objective for the reproduction of the diffused reflected light from the measuring point on the PSD detector.
|
« home